Tomorrow I’ll make a proper post about Lumen Tool Studio, because quite a lot has changed. As you may already have noticed, one of those changes is fairly significant: there is now a paid version of Lumen Tool.
I have plenty to say about why I made that decision, what stays free and what you actually get with Studio, so I’ll save that for tomorrow.
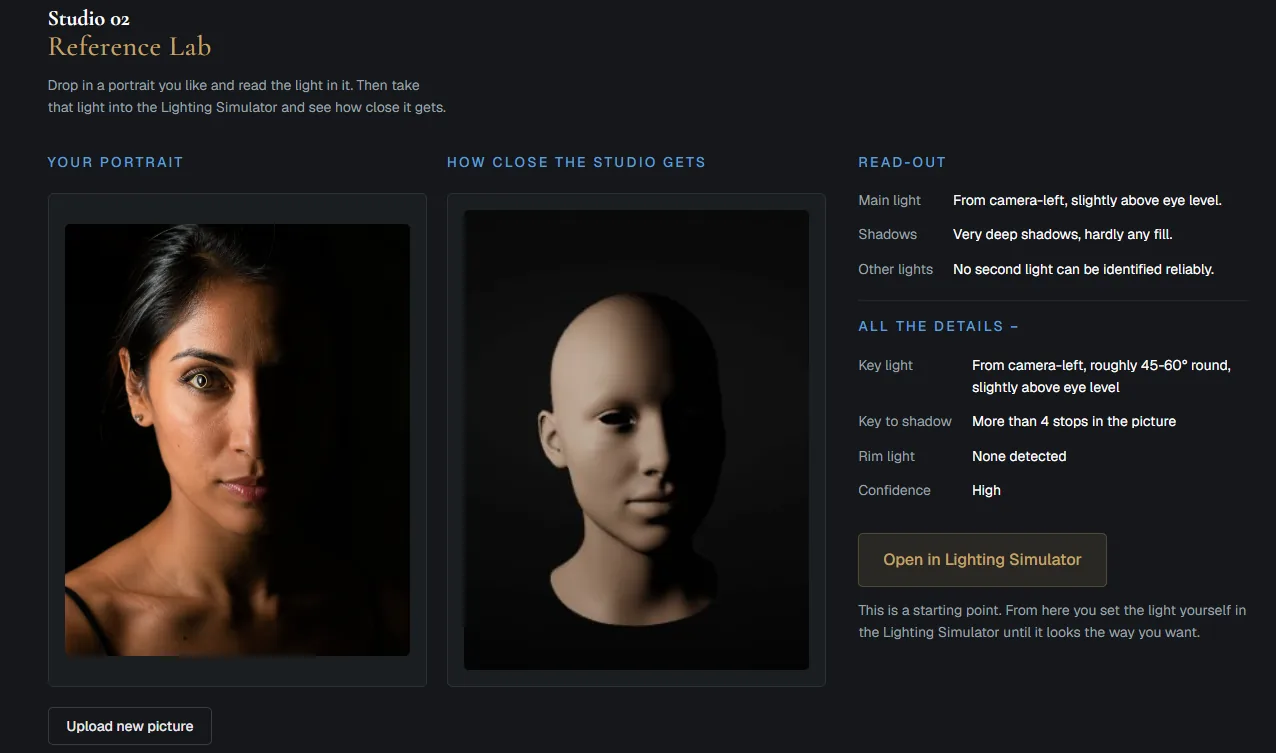
For now, I want to talk about something I’m genuinely very happy with: Reference Lab.
Lumen Tool is becoming modular
The way I’m building Lumen Tool Studio from here on is around separate modules.
The original Lumen Tool has become the Lighting Simulator. It is still the place where you can build a lighting setup from scratch, move lights around a 3D head and experiment with direction, intensity, distance, softness and colour.
There have been quite a few improvements there as well, but Reference Lab is the first completely new module I’ve built for Studio. And it is the second of quite a few modules I have planned.
The idea behind it came from something I see asked surprisingly often.
On Reddit, Facebook groups and photography, drawing and art forums, people regularly post a photograph and ask: “How was this lit?”
Or more specifically: where was the key light, how high was it, how far around the subject was it, how much fill was there, and how can I get somewhere close to this look myself?
There are already tools that try to answer those questions. Some are better than others. There are also quite a few claims being made that I don’t think are realistic.
The simple truth is that you cannot look at one finished photograph and know with 100% certainty exactly what happened outside the frame. You don’t know the room, the modifier, all the reflections, the camera processing, what was done in post, or even necessarily how many lights were used.
So when a tool claims it can reconstruct the exact original lighting setup from a single photograph, I would take that with a fairly large grain of salt.
Reference Lab deliberately does not make that promise.
No AI credits and no photo limit
Another thing I wanted to avoid was turning this into another AI feature where you get 20 credits a month and every photograph costs you one.
Reference Lab does not need that.
The analysis itself runs locally in your browser. There is no AI model sitting somewhere in the cloud looking at every photograph you give it, so there is no AI usage bill attached to every analysis and no reason for me to give you a monthly photo allowance.
If you want to analyse two photographs, analyse two. If you want to analyse 200, analyse 200.
How Reference Lab analyses portrait lighting
Without getting too technical, Reference Lab looks at the face itself and measures how the light behaves across it.
It analyses things such as the brightness difference between different parts of the face, where the brighter and darker areas fall, how deep the shadows are, how much apparent fill there is and the general direction from which the dominant light appears to be coming.
It also uses the geometry of the face to help interpret those measurements. The eyes are analysed too, including visible catchlights and their position, shape and size. When they are clear enough, they provide additional clues about the direction and character of the light source.
From that information it estimates things such as whether the main light is coming from the left or right, roughly how high it is and within what sort of angle it is likely to be positioned.
And I deliberately use words like roughly and likely here.
Reference Lab does not pretend that it knows a light was at exactly 47 degrees, or that a certain softbox was exactly 120 centimetres wide. A photograph simply does not contain enough information to make claims like that reliably.
Where something cannot be determined properly, Reference Lab says so. It also gives the analysis a confidence level.
That makes it less spectacular as a marketing claim, perhaps, but considerably more useful in practice.
A practical starting point
This is the most important part of Reference Lab.
It is not supposed to tell you “this is exactly how this photograph was made.” It is supposed to tell you “this is a sensible place to start.”
That is also why I called it Reference Lab.
You give it a reference photograph, it analyses the visible lighting, and it gives you a practical starting point for recreating something similar.
And this is where the combination with the Lighting Simulator becomes particularly useful.
Once Reference Lab has analysed the photograph, you can send that setup directly into the Lighting Simulator with one click.
Your reference photograph then stays available next to the simulator while you work. You can make it larger or smaller, keep checking it against the 3D result, move the lights around and refine the suggested setup yourself.
Reference Lab does the first bit of detective work. The Lighting Simulator gives you the space to take it from there.
That combination is really what I wanted when I started building this: a practical way to go from “I like the lighting in this photograph” to an actual setup you can start experimenting with, rather than a magic button pretending to know everything.
Is it perfect? No. I don’t think a tool like this ever will be.
There will always be unusual photographs, heavy editing, strange reflections or lighting situations where there simply isn’t enough visible information to make a strong estimate.
But at this point I’m about 90% happy with where Reference Lab is, which in my case is probably about as close to finished as anything ever gets.
I’ll keep improving the analysis as I find better ways of measuring things without pretending the tool knows more than it really does.
Next: the Archive
And then there is the obvious next question: what happens to all these setups and reference photographs once you start using Studio regularly?
At the moment, your projects and saved setups are still kept locally on your own computer.
That is what I’m working on next.
The third Studio module will be the Archive.
The idea is that your lighting setups, Reference Lab photographs and other saved work will eventually be stored inside your account instead of only living on one computer. You’ll be able to open the Archive and find the work you saved earlier without having to manage separate local files yourself.
I’m building that now and I’ll talk more about it once it is a little further along.
You can now read more about why Lumen Tool Studio is paid, what the subscription supports, and why the original Lumen Tool stays free.